Max's Blog

Exploring Technology

My latest project is www.ravenwulfconsulting.com. Its still a work in progress. Everything from design, to hosting was my responsibility and I’m delighted at the results.

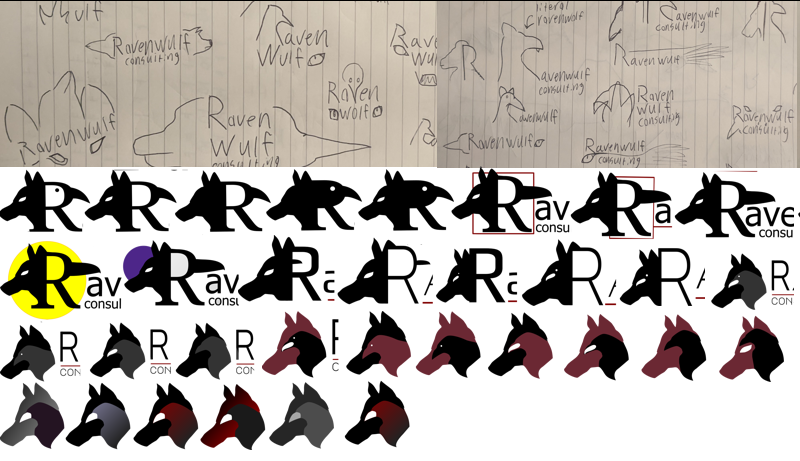
Logo design and identity

The logo of Ravenwulf was challenging to design. The request was to create a unique identity without making it look like a Harry Potter house crest. After some iterations on the design, we finally landed on the right balance of interesting and corporate. I used Inkscape to build out the designs but exporting it was a bit of a chore. SVG specifications are all over the place and don’t always render correctly across devices.

uploaded!

Tech stack

uploaded!

Ravenwulf is powered by Nuxt.js with the front end built using TailwindCss. I have never used either of these technologies before but they are modern and well documented.

I chose to use nuxt.js because its of declarative routing, server side rendering, good SEO options and most importantly, it uses Vue.js. Im a big Vue fan. I dont own any Vue clothing but its only a matter of time.

Next, I chose TailwindCSS because of all the hype. Was it really all its cracked up to be? Why relearn 100’s of CSS selectors all over again just to get some new shorthand options? After spending some time with it, the short answer is “Hell Yes! Its good!”

That’s all I needed for this project. Almost all the configurations are the defaults. My goal was to minimize dependencies and keep the project maintainable should someone else ever end up working on it.

Hosting and Email

I didn’t want to spend much money on hosting. I actually didn’t want to spend any money. This is where Cloudflare Pages enters the picture. They offer free hosting, for lower traffic projects, on their super robust edge network.

Cloudflare offers automatic builds. To trigger them, simply push to a Git Repo. Within minutes I had Ravenwulf in a git repo and connected to Cloudflare Pages. Just like that, the site was live.

Hooking up the “Contact Form” and Sending email from the ravenwulf was the only part of this project that was truly a headache. Mostly because the feature is new and the documentation is a mess. After much struggling, the contact form was setup and working. I detailed a setup guide here.

Thoughts on the tech

I’m extremely happy with the tech that runs Ravenwulf.com.

TailwindCSS is a fantastic tool. It made prototyping and building the site a breeze. Its major advantage is how explicit all the CSS declarations become. No more checking the style of .btn then .main then .content then checking the inspector to see how they are being rendered. Its all made clear from a glance at the element. While this does lend itself to more bulky, confusing and cluttered HTML syntax,the benefits completely outweigh the cons. Tailwind provides easy access to flexbox, responsive elements and color pallets. Additionally, almost never checking the inspector in the Browser make tailwind an absolute delight. Despite its added dependencies it will be my go-to on future projects.

Nuxt.js is a great framework. I barley scratched the surface of what its capable of doing because it does so much out of the box. I set up some pages, a couple components and thats it. It automatically generates routes. It automatically manages component includes. Its dev server is setup with file watching and hot-reloading. One click here, a click there and an entire site is built. There are tons of additional tools and options in Nuxt should anything else arise in the project, im sure nuxt could handle it. It also has a pretty large repository of Plugins.

Inkscape is a great tool but its SVG export options are frustrating to say the least. It supports a large number of tools and options. While browsers only support a small subset of what Inkscape is capable of creating. The internet is riddled with support threads asking why gradients don’t render, elements don’t appear, layer masks don’t work on export or why entire SVGs are empty after saving. If Inkscape had an “export to web” option, it would be a top quality piece of open source software. Without that, its tough to recommend. I guess you can use Adobe Illustrator but I ain’t got the money for that.

Cloudflare has a partnership with MailChannels which has allowed Cloudflare to introduce email sending into its web workers. There is some documentation to set this up but its all over the place. Here are the steps I took to get email sending running, using workers.

Before getting started you want to generate public and private keys for your DKIM records.
I grabbed steps from this guide -> https://github.com/cloudsecurityalliance/webfinger.io/blob/main/docs.webfinger.io/DKIM-setup.md

Generate a DKIM private and public key:

Private key as PEM file and base64 encoded txt file:

1
openssl genrsa 2048 | tee priv_key.pem | openssl rsa -outform der | openssl base64 -A > priv_key.txt

Public key as DNS record:

1
2
echo -n "v=DKIM1;p=" > pub_key_record.txt && \
openssl rsa -in priv_key.pem -pubout -outform der | openssl base64 -A >> pub_key_record.txt
Setup DNS records:

SPF record:
TXT, YOUR DOMAIN.COM, v=spf1 ~all

DMARC record:
TYT,
_dmark,
v=DMARC1; p=none;rua=mailto:[email protected]

Mail Channels Record:

Important note, this is the domain of your worer sending emails. Its probably something like “dev.yourdomain.com” check your worker setup.
TXT,_mailchannels,v=mc1 cfid=YOUR DOMAIN.COM

Mailchannels Domain Key Record:
TXT,mailchannels._domainkey,CONTENTS OF pub_key_record.txt

Setup a new worker for sending emails

Go into cloudflare and setup a new worker.js and paste in the following code.

1
2
3
4
5
6
7
8
9
10
11
12
13
14
15
16
17
18
19
20
21
22
23
24
25
26
27
28
29
30
31
32
33
34
35
36
37
38
39
40
41
42
43
44
45
46
47
48
49
50
51
52
53
54
55
56
57
58
59
60
61
62
63
64
65
66
67
68
69
70
71
72
73
74
addEventListener("fetch", event => {
event.respondWith(handleRequest(event.request))
})

async function handleRequest(request) {

let respContent = "";

// only send the mail on "POST", to avoid spiders, etc.
if( request.method == "POST" ) {

const formData = await request.formData();
const body = {};
for (const entry of formData.entries()) {
body[entry[0]] = entry[1];
}
fls = JSON.parse(JSON.stringify(body));

let send_request = new Request("https://api.mailchannels.net/tx/v1/send", {
"method": "POST",
"headers": {
"content-type": "application/json",
},
"body": JSON.stringify({
"personalizations": [
{ "to": [ {"email": "[email protected]",
"name": 'Email Tester'}],
"dkim_domain": 'YOURDOMAIN.com',
"dkim_selector": 'mailchannels',
"dkim_private_key": `<${PrivateKey}>`,

}
],
"from": {
"email": "[email protected]",
"name": "admin",
},
"reply_to": {
"email": `${body.email}`,
"name": `${body.name || 'No Name Provided'}`,
},
"subject": `${body.subject || 'No Subject'}`,
"content": [{
"type": "text/plain",
"value":
`Email: ${body.email}
Name: ${body.name || 'No Name Provided'}

${body.message || 'No Message'}
`,
}],
}),
});

const resp = await fetch(send_request);
respContent = resp.status + " " + resp.statusText
}

let htmlContent = "<html><head></head><body><pre>" +
`
<form method="post">
Sub: <input type="text" name="subject" value="Testing email sending" /><br>
Name: <input type="text" name="name" value="Testman Testerguy" /><br>
Email: <input type="text" name="email" value="[email protected]" /><br>
Msg: <input type="text" name="message" value="This is a test email to test the email send worker" /><br>
<input type="submit" value="Send"/>
</form>
` +
"<pre>" + respContent + "</pre>" +
"</body></html>";
return new Response(htmlContent, {
headers: { "content-type": "text/html" },
})
}

This code is crap and extremely insecure. Its a combination of code from various sources. Its super crappy. Its just a simple foundation to get your own worker set up.

Pay close attention to the status messages after posting the form.

  • 200 - Success
  • 400 - DNS records are not set up properly, or didn’t propagate. Mailchannels is rejecting request.
  • 500 - Post data isn’t correct. You won’t get any error messages, just a 500

Best of luck getting everything running.

Sources:

Running a bash script on system start can be an involved process, depending on you distro. The proper way is to create a system service and plug it into /init.d but you can leverage the crontab if you want a simple quick way to run something on startup.

How to run a script on start up/reboot
Create Script
cd return to user home
vim startup.sh create script
chmod +x startup.sh Make script executable
crontab -e Edit crontab

Add the line
@reboot sh $HOME/startup.sh

Now your script will run on reboot.
Source Stack overflow thread

I was noticing high CPU usage for the pipewire process on Ubunutu.

After some digging, I came across this thread. The culprit is an accessibility feature in Firefox. If you are not using firefox’s speech synthases features you can disable it to drop CPU usage.

  1. Type about:config into the Address bar.
  2. Search media.webspeech.synth.enabled
  3. Set media.webspeech.synth.enabled to false.
  4. Restart Firefox and check pipwire process cpu usage

Sometimes you need to change the remote origin in a git repo, if the server moves or if you just get better at NGINX and change the URL to something cleaner. Here are the simple steps on how to update your remote origin.

List remote origins

git remote -v

Add new remote origin

git remote set-url add origin https://sweetNewDomain/git/user/RepoName

Remove old origin

git remote set-url delete origin 192.168.1.33:3030/git/user/RepoName

List remote origins again

git remote -v

Verify that your URLs are correct and do a git fetch make sure everything is working. On your next push, you will need to re-enter your username and password.
Nice work!

At some point I became infatuated with the SAMA IM01 Case. At only 22 liters, it can house an ATX power supply and a large cooler. I bought two! Thus began the journey of rebuilding both my PC and my unRaid server into smaller cases.

Server Going into the SAMA

Had to purchase an ATX motherboard for complete this one.
upload successful

Server Complete

Cramming three hard drives and an SSD into this case, with an ATX power supply wasn’t easy. I had to get creative with the mounting. Two are semi mounted on the bottom while the third is mounted into screw holes. There is an additional intake fan mounted below the PSU which was removed for this photo.
upload successful

PC going into SAMA

My PC was already pretty small, with an ATX board, so it wasn’t much trouble to transplant it. I couldn’t fit my favorite cooler, the NHD15 and had to switch to the Scythe Fuma.
upload successful

PC complete

All in all the build came out nice but I ended up being very frustrated with the noise and performance. I switched all the fans to the Noctua Noctua NF-P12 redux which are affordable and perform extremely well.
upload successful

Final picture of both of them before cleaning everything up

upload successful
All in all I’m extremely satisfied with how these PCs came out. There isn’t much advantage to stuffing everything into a smaller case. Its generally louder and hotter. The only thing you get is satisfaction.

a .nomedia file tells android to ignore folder contents

Tired of the contents of your android folders showing up in other applications?

For example, if you have an “audio-books” folder, you don’t want that appearing in your music app.
If you have a “spicy memes” folder, you don’t want that appearing in your photos app.

Android has a built in mechanism that tells the system “Hey, ignore the contents of this folder.” Simply browse into the folder (On your phone) and create an empty file, name that file .nomedia. Thats it! Android will now ignore that folder.

Sleep Linux Mint with this keyboard shortcut

CTRL + ALT + END

This shortcut was oddly challenging to find.
I hope others enjoy using it as much as I do.
Goodnight

This will walk you through installing a custom rom on your phone, updating the firmware and installing google apps. Then rooting your phone.

This tutorial is intended for a OnePlus 7 Pro, executed on a Debian based Linux machine but the same steps can be applied to windows. I’m running Linux Mint.

Any custom android rom requires an unlocked bootloader. If your bootloader is not unlocked, find a tutorial on how to do that.
If this is your first time installing the crDroid, you should factory reset your phone.

Install Android platform tools

Here is a good explanation on android debug bridge (ADB) and other tools -> https://wiki.lineageos.org/adb_fastboot_guide
Here is a link for platform specific setups.
https://www.xda-developers.com/install-adb-windows-macos-linux/#how-to-set-up-adb

On Linux you can just use a package manager to install the required tools:
sudo apt-get install android-tools-adb android-tools-fastboot

Download all required packages

Navigate to -> https://crdroid.net/guacamole/9 and Download:

  • Latest ROM click -> “Download latest version” button
  • Latest Firmware click -> “Firmware” button and download latest version
  • Latest Gapps click -> “Gapps” button -> Latest folder -> Download the Gapps version you need. If you are unsure, just grab “NikGapps-stock-…”
  • Latest Recovery -> Recovery -> Download Latest Version. If your recovery is not the crDroid recovery, download it now.

Testing your tools are set up correctly

Open a terminal window and type in adb --version make sure it prints out the version and the installed path. Do the same again with fastboot --version.

Its essential to have both fastboot and adb accessible and set up correctly or the firmware update script won’t work correctly.

Connect to your phone via USB and enable USB debugging

  • Grab your Phone. Make sure you enable USB Debugging in the developer menu.
  • On your machine run sudo adb devices
  • On your phone you should get a prompt, Allow USB Debugging? YES!
  • Your computer should list the connected devices. Now reboot your phone to the bootloader with the command
  • adb reboot bootloader your phone will restart to the bootloader.

Enter fastboot to install crDroid recovery

  • Plug in your phone and use command adb reboot fastboot to boot into fastboot.
  • Flash the crDroid recovery boot.img with command fastboot flash boot boot.img
  • Now restart to recovery with command fastboot reboot recovery
  • Make sure crDroid recovery installed correctly.

Enter fastboot to apply firmware update

  • Inside the bootloader, use the up/down volume buttons until the top says “Recovery Mode” press the lock button to select. The phone will boot into recovery mode.
  • Select “Advanced” -> “Enter Fastboot”
  • Your phone is now ready for the firmware update. On your computer, extract “OP7Pro firmware flash tool.zip” and enter the folder. You will see “Update-firmware.bat” and “Update-firwmare.sh”
  • On windows you can just double click “update-firmware.bat”
  • On Linux run the command ./Update-firmware.sh then follow the prompts on screen. (Yes to everything)
  • Once the update is complete, on your phone press “Enter Recovery”

Enter recovery to sideload packages

  • Inside the bootloader, use the up/down volume buttons until the top says “Recovery Mode” press the lock button to select. The phone will boot into recovery mode.
  • Select “Apply Update” -> “Apply from adb”
  • Your phone is now ready for packages from your computer.
    On your computer:
  • Update Rom: run the command adb sideload <crdroid update.zip>
  • Reboot to recovery again.
  • Update Gapps: run the command adb sideload <selected gapps.zip>
  • “Reboot system now”

Root your phone

  • Make sure you booted into your phone and unlocked it. Make sure all updates are complete.
  • Browse to -> https://themagisk.com/ and download the magisk.apk
  • Install the magisk.apk on your phone.
  • Reboot back into recovery adb reboot recovery and select “Apply Update” -> “Apply from adb”
  • Browse to -> https://themagisk.com/ on your computer and download the SAME magisk.apk
  • Rename “Magisk.apk” to “Magisk.zip”
  • Now sideload the apk straight into your phone adb sideload Magisk.zip
  • “Reboot system now”
  • On your phone, download and install the magisk.apk
  • You can now do rooted things.

Unable to mount error

  • If you see this error its because your data partition is encrypted. Do not worry about it. You can still access your phone with ADB.

Useful ADB Commands

  • Print a list of connected devices: adb devices
  • Kill the ADB server: adb kill-server
  • Install a package: adb install <path to apk or zip file>

Search text files in current directory and all sub directories. Its super fast so don’t worry if you have a node_modules directory or something.

Use this command:
grep -rnw '.' -e 'search text'

0%